
Use the campaign launcher
This guide covers the template-based campaign launcher. Available campaign screens depend on your organization. If New campaign opens a different builder, contact Jericho Support for the instructions that match your account.
An attack template is a reusable starting point. The launcher uses it to create a campaign with the recipients and schedule you choose. To create or maintain templates, see Use Attack Library and attack templates.
Before you begin
Section titled “Before you begin”- Sign in as an Admin or Manager. See workspace roles.
- Prepare an employee group for a small pilot.
- Confirm the sending domains and delivery configuration using the allowlisting guide.
Choose an attack template
Section titled “Choose an attack template”- Open New campaign.
- Under Start from an attack template, use Search attack templates to find a template by name. Use Attack template to choose Jericho or Team, and Campaign type to narrow the results. Additional filters let you narrow the generation mode and attack type.
- Open a template and review its attack details and available preview. For an email pilot, choose an email template that matches your intended scenario.
- Click Select to open Manage Campaign. Check Template from to confirm the source and template name.
Choose Start from scratch if you want to build a campaign without a preset. That opens a separate builder with different controls.
Review campaign settings
Section titled “Review campaign settings”- Set Campaign Name to a recognizable name.
- Review Attack Scenario and the template’s message/landing-page behavior.
- Review Training, including whether follow-up training is enabled and which courses are selected.
- Under Recipients, select the intended groups. Verify group membership in People & Groups before launching.
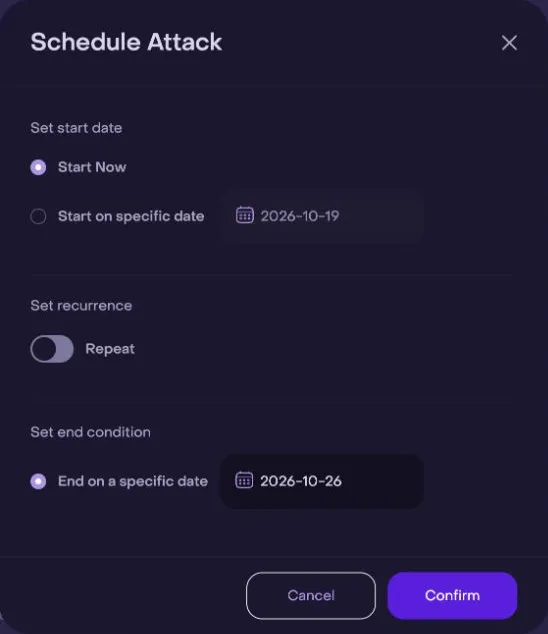
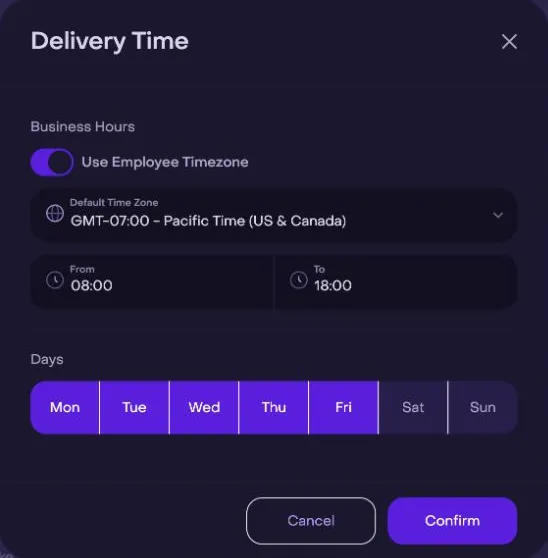
- Under Schedule, review Schedule Attack and Delivery Time, including the start date, recurrence, business hours, and time zone.
Use the edit control beside a setting to change it. The template determines which settings are available. Review Display Language or Audio Language, where shown, and the landing page or redirect used by the scenario. For voice campaigns, also verify the selected persona’s language before launch.
Choose follow-up training
Section titled “Choose follow-up training”For standalone course assignments and completion reporting, see Assign and track training in Jericho.
Open Training and use Add courses to campaign to choose available courses. Review the selected courses before returning to the campaign summary.
If the page says Training has been disabled in this template, choose a training-enabled template when follow-up training is required. Selecting courses alone should not be treated as confirmation that training is enabled.
Select recipients
Section titled “Select recipients”Open Recipients, then use Add groups to campaign to select the groups for this run. If available, Add custom groups to campaign lets you select custom groups as well. Review membership in People & Groups and start with a small test group.
If the launcher reports that no properly configured employees are available, check group membership and the contact or delivery configuration needed for the selected campaign type.
Set the schedule
Section titled “Set the schedule”- Open Schedule Attack.
- Choose Start Now or Start on specific date.
- For a one-time campaign, leave Repeat off and choose the end condition shown.
- For a recurring campaign, turn on Repeat. Set Launch a new simulation every and Each simulation runs for separately: the first controls how often a simulation starts; the second controls how long each one runs.
- Choose the available end condition, such as After running the number of times or Run continuously (no end date). Confirm the schedule and review its summary.
- Open Delivery Time. Review Default Time Zone, Business Hours, and Days, along with the employee time-zone option where available. Confirm your changes.
The start date and delivery window work together. Start Now does not promise immediate delivery to every recipient.
Preview and launch
Section titled “Preview and launch”- Click Preview and review the available message previews. If content is still generating, wait for it to finish before reviewing.
- Recheck the template, recipients, training status, language, landing page, and schedule. A preview is not confirmation that messages have been delivered.
- Click Launch Campaign when the campaign is ready. The application opens the campaign page.
- Review the campaign’s status, recipient processing, and results. Check delivery and reporting for the pilot before launching to a wider audience.
For post-launch reporting, see Understand campaign results and Compare dashboards and exports.
Reset or leave the launcher
Section titled “Reset or leave the launcher”Use Reset to default to restore the template’s default settings and review the campaign again. To return to template selection, use Select Template. The leave-page confirmation offers Discard & Leave or Stay on this page; leaving discards the in-progress campaign setup.
Template configuration and the separate Start from scratch builder expose different controls. Do not assume every launcher screen lets you select individual employees or change the sending domain.